MinIO 在 Kubernetes 上的实践探索
前言
对象存储是现代数据架构中不可或缺的组成部分。MinIO 作为一个高性能、兼容 S3 协议的对象存储系统,在 Kubernetes 环境中有着广泛的部署实践。本文将分享在 K8s 集群中部署 MinIO 的几种不同方式,以及在实际操作中积累的一些经验。
架构概览
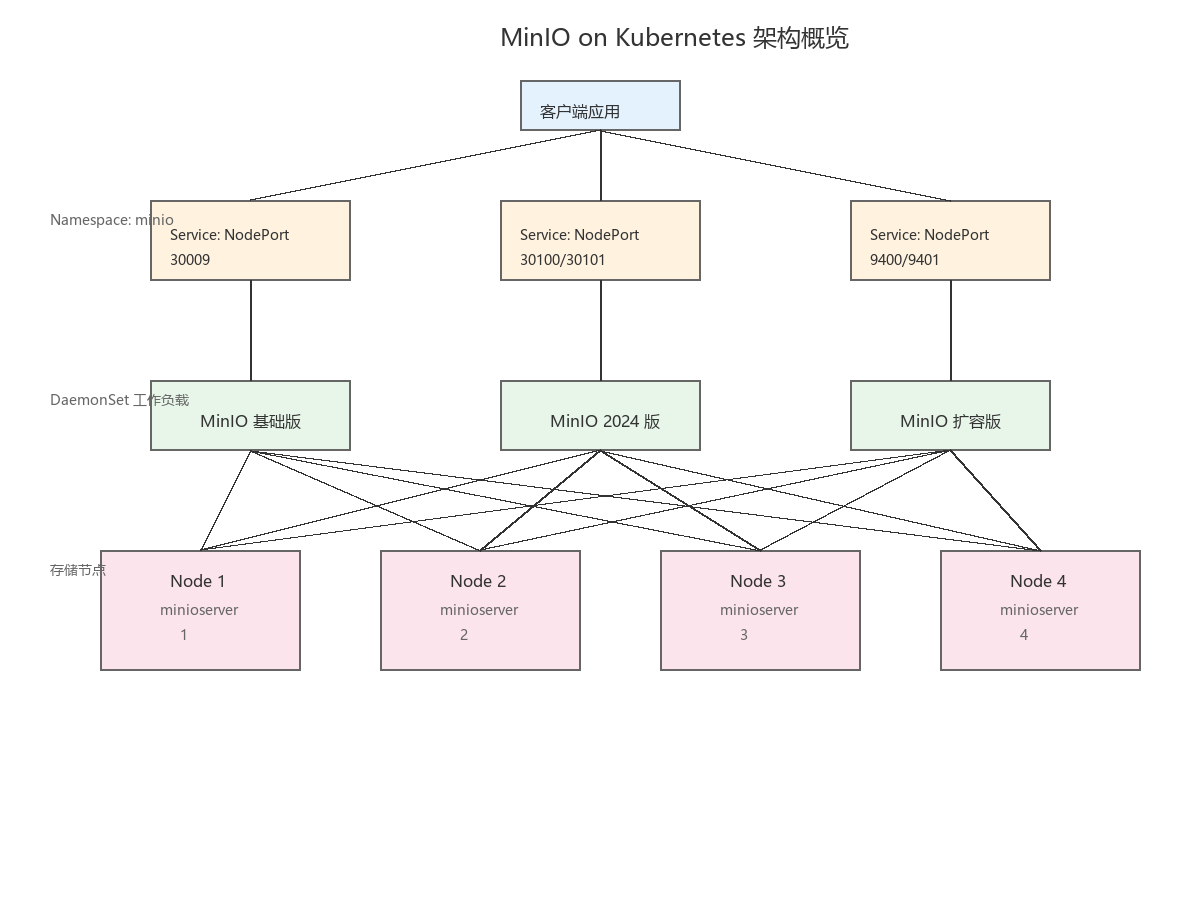
方案一:传统 DaemonSet 部署
核心配置
这种方式采用 DaemonSet 控制器,在指定标签的节点上各运行一个 MinIO 实例,组成分布式集群。
apiVersion: apps/v1
kind: DaemonSet
metadata:
  name: minio
  namespace: rtghj-minio
spec:
  selector:
    matchLabels:
      app: minio
  template:
    spec:
      # 节点选择:仅部署到标记为 minio-server=true 的节点
      nodeSelector:
        minio-server: "true"

      # 使用 HostNetwork 以获得最佳网络性能
      hostNetwork: true

      # 本地存储挂载
      volumes:
      - name: miniostorage
        hostPath:
          path: /home/minio/data

      # 集群节点主机名解析
      hostAliases:
      - ip: "xxx.xxx.xxx.xxx"
        hostnames:
        - "minioserver1"
      - ip: "xxx.xxx.xxx.xxx"
        hostnames:
        - "minioserver2"
      - ip: "xxx.xxx.xxx.xxx"
        hostnames:
        - "minioserver3"
      - ip: "xxx.xxx.xxx.xxx"
        hostnames:
        - "minioserver4"

      containers:
      - name: minio
        image: minio/minio:RELEASE.2021-04-18T19-26-29Z
        args:
        - server
        - http://minioserver{1...4}/data/minio
部署步骤
# 1. 为存储节点打标签
kubectl label nodes node-01 minio-server=true
kubectl label nodes node-02 minio-server=true
kubectl label nodes node-03 minio-server=true
kubectl label nodes node-04 minio-server=true

# 2. 在节点上创建数据目录
mkdir -p /home/minio/data

# 3. 应用配置
kubectl apply -f minio.yaml

# 4. 验证部署
kubectl get DaemonSet/minio -n rtghj-minio -o wide
kubectl get pod -n rtghj-minio -o wide
方案二:新版 MinIO 部署(推荐)
随着 MinIO 的迭代更新,新版本提供了更丰富的功能,包括独立的 Console 管理界面。
关键改进
| 特性 | 旧版本 | 新版本 |
|---|---|---|
| 镜像版本 | 2021.04 | 2024.05 |
| 环境变量 | MINIO_ACCESS_KEY/SECRET_KEY | MINIO_ROOT_USER/PASSWORD |
| 管理界面 | 内置 | 独立 Console 端口 |
| 配置持久化 | 无 | 支持 config 目录挂载 |
部署配置
# 服务暴露:API 端口
apiVersion: v1
kind: Service
metadata:
  name: minio2024-9300
  namespace: rtghj-minio
spec:
  type: NodePort
  ports:
    - port: 9300
      targetPort: 9300
      nodePort: 30100
  selector:
    app: minio2024

---
# 服务暴露:Console 管理界面
apiVersion: v1
kind: Service
metadata:
  name: minio2024-9301
  namespace: rtghj-minio
spec:
  type: NodePort
  ports:
    - port: 9301
      targetPort: 9301
      nodePort: 30101
  selector:
    app: minio2024

---
apiVersion: apps/v1
kind: DaemonSet
metadata:
  name: minio2024
  namespace: rtghj-minio
spec:
  template:
    spec:
      nodeSelector:
        minio-server: "2024"
      hostNetwork: true
      volumes:
      - name: miniostorage
        hostPath:
          path: /home/minio/data
      - name: minioconfig
        hostPath:
          path: /home/minio/config  # 配置持久化
      containers:
      - name: minio
        image: minio/minio:RELEASE.2024-05-28T17-19-04Z
        args:
        - server
        - --console-address
        - :9301      # 独立 Console 端口
        - --address
        - :9300      # API 端口
        - http://minioserver-n{1...4}:9300/data/minio
        volumeMounts:
        - name: miniostorage
          mountPath: /data/minio/
        - name: minioconfig
          mountPath: /root/.minio/
方案三:磁盘扩容实践
当存储空间不足时,可以通过挂载新磁盘来扩展容量。
磁盘准备
# 安装分区工具
apt install parted -y

# 创建 GPT 分区
parted /dev/sdb
mklabel gpt
mkpart primary 0% 100%
quit

# 格式化文件系统
mkfs.ext4 /dev/sdb1

# 创建挂载点并挂载
mkdir /data5
mount /dev/sdb1 /data5

# 配置开机自动挂载
echo "/dev/sdb1 /data5 ext4 defaults 0 0" >> /etc/fstab
扩容部署配置
apiVersion: apps/v1
kind: DaemonSet
metadata:
  name: miniodata5
  namespace: rtghj-minio
spec:
  template:
    spec:
      nodeSelector:
        minio-data5: "true"
      volumes:
      - name: miniostorage
        hostPath:
          path: /data5/minio/data   # 新磁盘路径
      - name: minioconfig
        hostPath:
          path: /data5/minio/config
      containers:
      - name: minio
        image: minio/minio:RELEASE.2024-05-28T17-19-04Z
        args:
        - server
        - --console-address
        - :9401
        - --address
        - :9400
        - http://minioserver{1...4}:9400/data5/minio
方案四:Operator 模式
对于需要更高级管理功能(如租户隔离、自动扩缩容)的场景,可以考虑使用 MinIO Operator。
# 添加 Helm 仓库
helm repo add minio https://operator.min.io/
helm repo update

# 下载 Chart
helm pull minio/minio-operator --untar

# 部署 Operator
cd minio-operator
helm install minio-operator . --namespace rtghj-minio

# 升级
helm upgrade minio-operator . --namespace rtghj-minio
实践中的注意事项
1. 节点选择策略
使用 DaemonSet 部署时,通过 nodeSelector 可以精确控制哪些节点运行 MinIO Pod:
# 查看节点标签
kubectl get node --show-labels=true

# 添加/移除标签
kubectl label nodes <node-name> minio-server=true
kubectl label nodes <node-name> minio-server- --overwrite
2. HostNetwork 的考量
启用 hostNetwork: true 可以让 Pod 直接使用宿主机的网络栈,减少网络跳转带来的延迟。但需要注意:
- 端口冲突问题
- 同一节点上不能运行多个相同端口的 Pod
3. 数据目录规划
/home/minio/data/      # 默认数据目录
/home/minio/config/    # 配置目录(新版本推荐)
/data5/minio/data/     # 扩展磁盘目录
4. 集群通信配置
hostAliases 确保集群内各节点能够相互解析:
hostAliases:
- ip: "xxx.xxx.xxx.xxx"
  hostnames: ["minioserver1"]
- ip: "xxx.xxx.xxx.xxx"
  hostnames: ["minioserver2"]
# ... 其他节点
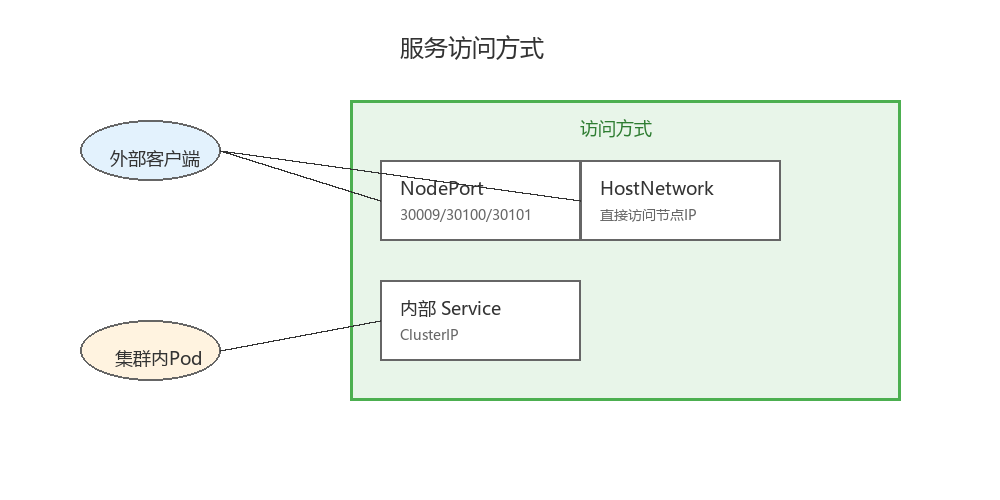
5. 服务访问方式
故障排查常用命令
# 查看 Pod 状态和分布
kubectl get pod -n rtghj-minio -o wide

# 查看 DaemonSet 详情
kubectl get DaemonSet/minio2024 -n rtghj-minio -o wide

# 查看 Pod 事件和日志
kubectl describe pod <pod-name> -n rtghj-minio
kubectl logs <pod-name> -n rtghj-minio --all-containers=true

# 进入容器调试
kubectl exec -it pod/<pod-name> -n rtghj-minio -- /bin/bash

# 查看节点资源使用
kubectl top node
kubectl top pod -n rtghj-minio
总结
本文介绍了在 Kubernetes 上部署 MinIO 的几种实践方式,从简单到复杂分别是:
- 基础 DaemonSet 部署 - 快速上手,适合测试环境
- 新版 MinIO 部署 - 推荐生产环境使用,功能更完善
- 磁盘扩容方案 - 解决存储空间不足的问题
- Operator 模式 - 适合大规模、多租户场景
选择合适的部署方式,需要根据实际的业务需求、集群规模以及运维能力来决定。
参考配置
节点标签管理
| 部署方式 | 节点标签 |
|---|---|
| 基础部署 | minio-server=true |
| 2024 版本 | minio-server=2024 |
| 扩容部署 | minio-data5=true |
端口规划
| 服务 | API 端口 | Console 端口 | NodePort |
|---|---|---|---|
| 基础版 | 9000 | - | 30009 |
| 2024 版 | 9300 | 9301 | 30100/30101 |
| 扩容版 | 9400 | 9401 | - |
本文档基于实际部署经验整理,配置参数请根据实际环境调整。