CI/CD流水线:Jenkins + APISIX微服务部署实践
概述
微服务架构的CI/CD流水线设计是DevOps实践的核心。本文将介绍如何使用Jenkins Pipeline、Docker和APISIX构建完整的微服务持续集成与持续部署系统。
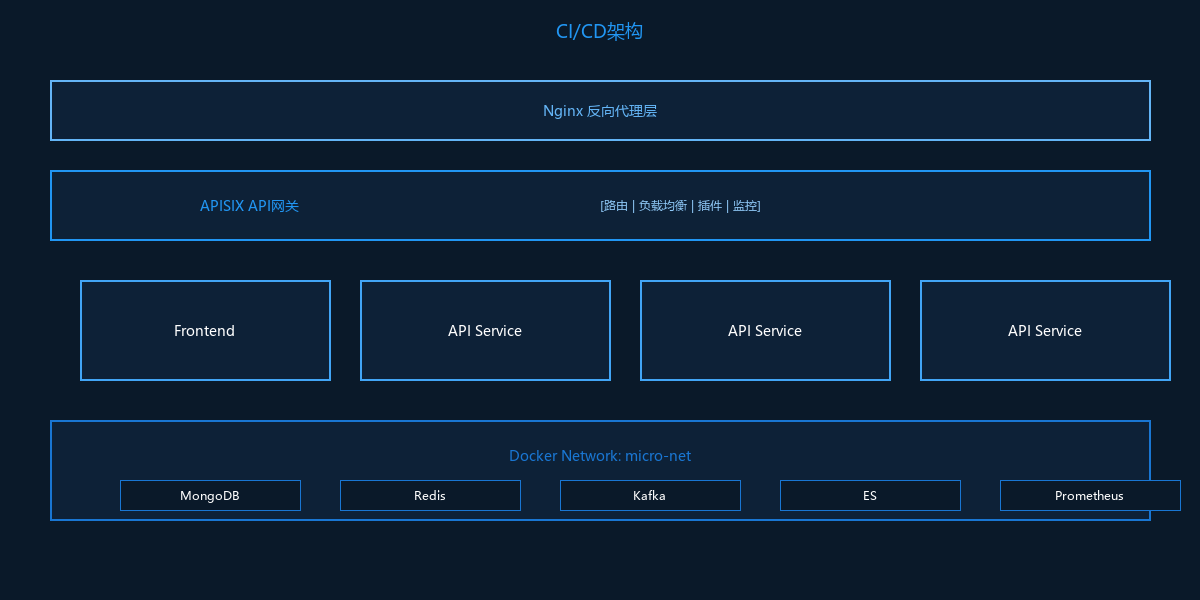
架构概览
CI/CD流程
Jenkins Pipeline设计
流水线流程
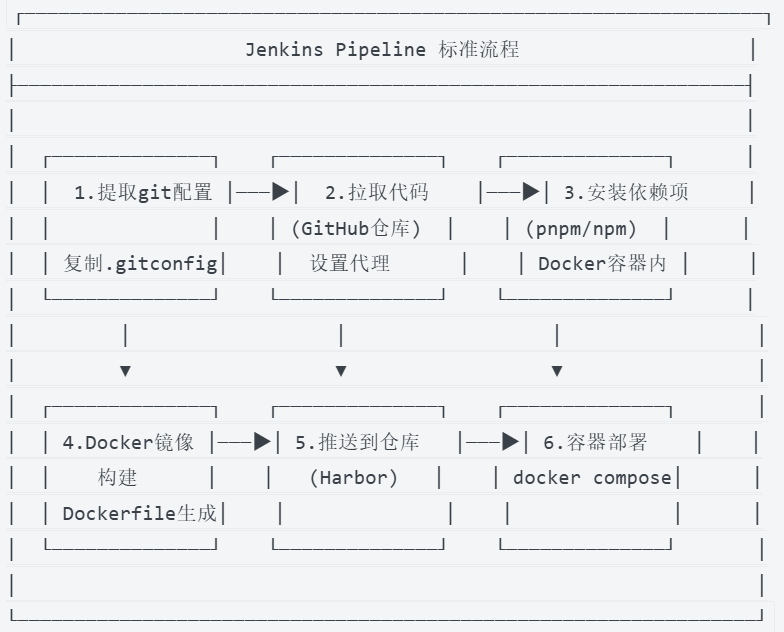
Jenkinsfile示例
// console/Jenkinsfile
pipeline {
    agent {
        label "srv30"                    // 指定Jenkins节点
    }

    environment {
        REGISTRY ="reg.lc.xxx.com"       // Harbor镜像仓库
        PROJECT_NAME ="micro"            // 项目名称
        APP_NAME ="console"              // 应用名称
        DOCKER_HOST_URL = "tcp://192.168.x.x:2375"  // Docker远程主机
        GITHUB_PROXY = "http://192.168.x.x:7890"    // GitHub代理
        APP_VERSION ="${params.version}" // 版本参数
        CLIENT_CODE = "micro"            // 客户端代码
    }

    stages {
        // 阶段1:提取Git配置
        stage("提取git配置") {
            steps {
                sh """
                    mkdir -p ./code/
                    cp -R .gitconfig ./code/.gitconfig
                """
            }
        }

        // 阶段2:拉取代码
        stage("拉取代码") {
            steps {
                dir("code"){
                    script {
                        sh """
                            git config http.proxy ${GITHUB_PROXY}
                            git config https.proxy ${GITHUB_PROXY}
                        """
                        checkout scmGit(
                            branches: [[name: "*/main"]],
                            extensions: [],
                            userRemoteConfigs: [[
                                credentialsId: "github-pass",
                                url: "https://github.com/org/micro-platform.git"
                            ]]
                        )
                    }
                }
            }
        }

        // 阶段3:安装依赖和构建
        stage("安装依赖项") {
            steps {
                script{
                    sh """
                        cp -R ./${APP_NAME}/env ./code/${APP_NAME}/.env
                    """
                }
                dir("code/${APP_NAME}"){
                    script {
                        docker.image("${REGISTRY}/library/nodepm2:22.14.0-build").inside {
                            sh """
                                node -v
                                npm config set registry https://registry.npmmirror.com
                                pnpm install
                                rm -rf dist
                                npm run build
                            """
                        }
                    }
                }
            }
        }

        // 阶段4:Docker镜像构建
        stage("docker镜像构建") {
            steps {
                script{
                    IMAGE_PREFIX = "${REGISTRY}/${PROJECT_NAME}/${APP_NAME}"
                    IMAGE_NAME = "${IMAGE_PREFIX}:${APP_VERSION}"
                }
                withCredentials([usernamePassword(
                    credentialsId: "harbor-cred",
                    passwordVariable: "HARBOR_PASSWORD",
                    usernameVariable: "HARBOR_USER"
                )]) {
                    sh """
                        cp -R Nginx-Dockerfile ./Dockerfile
                        sed -i "s#{base-image}#${REGISTRY}/library/nginx-vts:1.26.3.3#g" Dockerfile
                        sed -i "s#{file-folder}#code/${APP_NAME}/dist#g" Dockerfile
                        sed -i "s#{client_code}#${CLIENT_CODE}#g" console.conf
                        echo "${HARBOR_PASSWORD}" | docker login ${REGISTRY} -u "${HARBOR_USER}" --password-stdin
                        docker build -t ${IMAGE_NAME} .
                        docker push ${IMAGE_NAME}
                        sleep 2
                    """
                }
            }
        }

        // 阶段5:容器部署
        stage("docker容器部署") {
            steps {
                dir("${APP_NAME}"){
                    sh "docker compose version"
                    sh """
                        sed -i "s#{image}#${IMAGE_NAME}#g" docker-compose.yml
                        docker compose down
                        docker compose up -d
                    """
                }
            }
        }
    }

    post {
        success {
            echo "版本${APP_VERSION}构建成功"
            buildDescription("版本号: ${APP_VERSION}")
        }
        always {
            script {
                try {
                    sh "docker images -a | grep '${IMAGE_PREFIX}' | awk '{print \$3}' | xargs docker rmi"
                } catch (Exception e) {
                    echo "Could not remove image"
                }
            }
        }
    }
}
不同类型的Jenkinsfile
前端Console(Vue.js + Nginx)
// console/Jenkinsfile(前端)
// 关键差异:
// 1. 使用nodepm2镜像构建
// 2. 输出dist目录
// 3. 基于Nginx镜像运行

stage("安装依赖项") {
    steps {
        docker.image("${REGISTRY}/library/nodepm2:22.14.0-build").inside {
            sh """
                pnpm install
                npm run build
            """
        }
    }
}

stage("docker镜像构建") {
    steps {
        sh """
            cp -R Nginx-Dockerfile ./Dockerfile
            sed -i "s#{base-image}#${REGISTRY}/library/nginx-vts:1.26.3.3#g" Dockerfile
            sed -i "s#{file-folder}#code/${APP_NAME}/dist#g" Dockerfile
            docker build -t ${IMAGE_NAME} .
            docker push ${IMAGE_NAME}
        """
    }
}
Node.js API服务
// llm.api/Jenkinsfile(后端API)
// 关键差异:
// 1. 无需构建步骤
// 2. 使用Node + PM2运行
// 3. 可能有多个进程

stage("docker镜像构建") {
    steps {
        sh """
            cp -R Node-Dockerfile ./Dockerfile
            sed -i "s#{base-image}#${REGISTRY}/library/nodepm2:22.14.0#g" Dockerfile
            sed -i "s#{file-folder}#code/${APP_NAME}#g" Dockerfile
            docker build -t ${IMAGE_NAME} .
            docker push ${IMAGE_NAME}
        """
    }
}
Python服务
// transform.api/Jenkinsfile(Python)
// 关键差异:
// 1. 使用uv安装依赖
// 2. 使用uvicorn运行

stage("docker镜像构建") {
    steps {
        sh """
            # Python服务使用代码仓库中的Dockerfile
            cd code/${APP_NAME}
            docker build -t ${IMAGE_NAME} .
            docker push ${IMAGE_NAME}
        """
    }
}
Docker配置
Dockerfile模板
Nginx前端模板
# Nginx-Dockerfile
FROM {base-image}

# 复制构建产物
COPY {file-folder} /console/dist

# 复制Nginx配置
COPY console.conf /etc/nginx/conf.d/default.conf

# 设置环境变量
ENV CLIENT_CODE={client_code}

EXPOSE 80

CMD ["nginx", "-g", "daemon off;"]
Node.js服务模板
# Node-Dockerfile
FROM {base-image}

# 复制应用代码
COPY {file-folder} /app

WORKDIR /app

# 环境变量
ENV NODE_ENV=production
ENV APP=server.js
ENV PM2PARAM=-i 2

EXPOSE 80

CMD ["pm2-runtime", "start", "${APP}", "${PM2PARAM}"]
Docker Compose配置
前端Console
# console/docker-compose.yml
version: '3.8'
services:
  console:
    image: {image}  # 由Jenkins替换
    container_name: micro-console
    ports:
      - "80"
    environment:
      - CLIENT_CODE=micro
    networks:
      - micro-net
    restart: unless-stopped
    healthcheck:
      test: ["CMD", "curl", "-f", "http://localhost:80"]
      interval: 30s
      timeout: 10s
      retries: 3

networks:
  micro-net:
    external: true
API服务(多实例)
# llm.api/docker-compose.yml
version: '3.8'
services:
  # HTTP API服务
  llm-api-http:
    image: {image}
    container_name: micro-llm-api-http
    environment:
      - APP=server.js
      - PM2PARAM=-i 2          # PM2集群模式
      - TZ=Asia/Shanghai
    extra_hosts:
      - "mongo-local:192.168.x.x"
      - "redis-local:192.168.x.x"
      - "es-local:192.168.x.x"
      - "kafka-local:192.168.x.x"
    networks:
      - micro-net
    deploy:
      resources:
        limits:
          cpus: '2.0'
          memory: 4G

  # gRPC服务
  llm-api-grpc:
    image: {image}
    container_name: micro-llm-api-grpc
    environment:
      - APP=grpc/server.js
      - PM2PARAM=-i 2
    networks:
      - micro-net

  # 消费者任务执行器
  llm-api-cons-agent-task-executor-1:
    image: {image}
    container_name: micro-llm-api-cons-agent-task-executor-1
    environment:
      - APP=consumers/agentTaskExecutor.js
      - PM2PARAM=-i 1
      - CLIENT_ID=llm-api-cons-agent-task-executor-1
    networks:
      - micro-net

networks:
  micro-net:
    external: true
Python服务
# transform.api/Dockerfile
FROM reg.lc.xxx.com/library/python:3.12-slim-uv

WORKDIR /app

# 复制依赖文件
COPY pyproject.toml uv.lock ./

# 安装依赖
RUN uv sync --no-dev

# 复制应用代码
COPY . .

# 暴露端口
EXPOSE 8000

# 启动命令
CMD ["uv", "run", "uvicorn", "main:app", "--host", "0.0.0.0", "--port", "8000"]
APISIX网关配置
主配置
# micro-apisix/config/apisix_conf/config.yaml

apisix:
  node_listen: 9080
  enable_admin: true
  admin_key:
    - name: "admin"
      key: "admin-key-change-me"
      role: admin

  ssl:
    enable: true
    listen:
      - port: 9443
    certificate: /usr/local/apisix/conf/cert/cert.pem
    certificate_key: /usr/local/apisix/conf/cert/key.pem

nginx_config:
  worker_processes: auto
  worker_connections: 4096

plugins:
  - cors
  - jwt-auth
  - limit-req
  - prometheus
  - proxy-rewrite
  - response-rewrite
  - serverless-pre-function

plugin_attr:
  prometheus:
    export_addr:
      ip: "0.0.0.0"
      port: 19091
路由配置
# 路由定义示例
routes:
  # 主控制台
  - uri: /console/*
    upstream:
      type: roundrobin
      nodes:
        "micro-console:80": 1
    plugins:
      proxy-rewrite:
        regex_uri: ["^/console/(.*)", "/$1"]

  # LLM API
  - uri: /api/llm/*
    upstream:
      type: roundrobin
      nodes:
        "micro-llm-api-http:80": 1
    plugins:
      cors:
        allow_origins: "*"
        allow_methods: "GET,POST,PUT,DELETE,OPTIONS"
        allow_headers: "*"
        max_age: 3600
      proxy-rewrite:
        regex_uri: ["^/api/llm/(.*)", "/$1"]
      # 流式响应优化
      response-rewrite:
        headers:
          X-Accel-Buffering: "no"

  # RAG API
  - uri: /api/rag/*
    upstream:
      type: roundrobin
      nodes:
        "micro-rag-api-http:80": 1
    plugins:
      cors:
        allow_origins: "*"
      proxy-rewrite:
        regex_uri: ["^/api/rag/(.*)", "/$1"]

  # Python转换服务
  - uri: /api/transform/*
    upstream:
      type: roundrobin
      nodes:
        "micro-transform-api:8000": 1
    plugins:
      proxy-rewrite:
        regex_uri: ["^/api/transform/(.*)", "/$1"]

  # 限流配置
  - uri: /api/*
    plugins:
      limit-req:
        rate: 100
        burst: 50
        rejected_code: 429
上游服务配置
upstreams:
  - id: llm-api
    type: roundrobin
    nodes:
      "micro-llm-api-http:80": 1
    checks:
      active:
        type: http
        http_path: /health
        healthy:
          interval: 5
          successes: 2
        unhealthy:
          interval: 5
          http_failures: 3
Nginx配置
主控制台配置
# console.conf
map '$http_origin' $allow_origin {
    '~^https?://(.*\.xxx\.com|localhost:.*)$'    $http_origin;
    default None;
}

server {
    listen       80;
    resolver 127.0.0.11 valid=10s;

    # API代理
    location ~ ^/(client-proxy|oauth)/ {
        set $backend_service "micro-ucenter-api-http";
        proxy_pass http://$backend_service:80;
        proxy_set_header X-Real-IP $remote_addr;
        proxy_set_header X-Forwarded-For $proxy_add_x_forwarded_for;
        proxy_set_header Host $http_host;
        proxy_set_header protocol 'https';
        proxy_set_header client-code {client_code};

        # 流式响应
        proxy_cache off;
        proxy_buffering off;
        chunked_transfer_encoding on;
        tcp_nopush on;
        tcp_nodelay on;
        keepalive_timeout 300;
    }

    # 静态资源
    location / {
        root   /console/dist;
        index  index.html index.htm;
        try_files $uri $uri/ /index.html;

        # CORS
        add_header 'Access-Control-Allow-Origin' $allow_origin always;
        add_header Content-Security-Policy "default-src 'self' *.xxx.com" always;

        # 缓存
        expires 1d;
        add_header Cache-Control "public, immutable";
    }

    # 健康检查
    location /health {
        access_log off;
        return 200 "healthy\n";
    }
}
APISIX代理配置
# nginx.d/micro-apisix.conf
server {
    listen       80;
    listen       443 ssl;
    server_name  api.lc.xxx.com;

    ssl_certificate      /etc/nginx/certs/api.lc.xxx.com.cer;
    ssl_certificate_key  /etc/nginx/certs/api.lc.xxx.com.key;
    ssl_protocols        TLSv1.2 TLSv1.3;
    ssl_ciphers          HIGH:!aNULL:!MD5;

    location / {
        set $backend_service "micro-apisix";
        proxy_pass http://$backend_service:9080;

        # 标准代理头
        proxy_set_header Host $host;
        proxy_set_header X-Real-IP $remote_addr;
        proxy_set_header X-Forwarded-For $proxy_add_x_forwarded_for;
        proxy_set_header X-Forwarded-Proto $scheme;

        # WebSocket支持
        proxy_http_version 1.1;
        proxy_set_header Upgrade $http_upgrade;
        proxy_set_header Connection "upgrade";

        # 流式响应优化(SSE)
        proxy_cache off;
        proxy_buffering off;
        proxy_read_timeout 300s;
        proxy_send_timeout 300s;
    }
}
监控与日志
Prometheus监控
# prometheus.yml
global:
  scrape_interval: 15s
  evaluation_interval: 15s

scrape_configs:
  - job_name: 'apisix'
    static_configs:
      - targets: ['micro-apisix:19091']
    metrics_path: /apisix/prometheus/metrics

  - job_name: 'docker'
    static_configs:
      - targets: ['192.168.x.x:9323']

  - job_name: 'node-exporter'
    static_configs:
      - targets: ['192.168.x.x:9100']
Grafana仪表板
{
  "dashboard": {
    "title": "Micro Platform",
    "panels": [
      {
        "title": "API请求速率",
        "type": "graph",
        "targets": [
          {
            "expr": "rate(apisix_http_status[5m])",
            "legendFormat": "{{status}}"
          }
        ]
      },
      {
        "title": "响应时间",
        "type": "graph",
        "targets": [
          {
            "expr": "histogram_quantile(0.95, rate(apisix_http_latency_bucket[5m]))",
            "legendFormat": "95th percentile"
          }
        ]
      }
    ]
  }
}
部署策略
蓝绿部署
# blue-green部署
version: '3.8'
services:
  # 蓝环境
  console-blue:
    image: reg.xxx.com/micro/console:v1.0.0
    container_name: micro-console-blue
    networks:
      - micro-net
    labels:
      - "traefik.enable=true"
      - "traefik.http.routers.console-blue.rule=Host(`console.xxx.com`)"

  # 绿环境
  console-green:
    image: reg.xxx.com/micro/console:v1.1.0
    container_name: micro-console-green
    networks:
      - micro-net
    labels:
      - "traefik.enable=true"
      - "traefik.http.routers.console-green.rule=Host(`console.xxx.com`)"
滚动更新
# 滚动更新脚本
#!/bin/bash
set -e

SERVICE_NAME=$1
NEW_VERSION=$2

# 1. 拉取新镜像
docker pull reg.xxx.com/micro/${SERVICE_NAME}:${NEW_VERSION}

# 2. 启动新容器(不停止旧容器)
docker run -d \
  --name ${SERVICE_NAME}-new \
  --network micro-net \
  reg.xxx.com/micro/${SERVICE_NAME}:${NEW_VERSION}

# 3. 健康检查
sleep 10
curl -f http://${SERVICE_NAME}-new:80/health || exit 1

# 4. 切换流量(更新APISIX上游)
curl http://apisix:9180/apisix/admin/upstreams/${SERVICE_NAME} \
  -H "X-API-KEY: admin-key" \
  -X PATCH \
  -d '{"nodes":{"'${SERVICE_NAME}'-new:80":1}}'

# 5. 停止旧容器
docker stop ${SERVICE_NAME}
docker rm ${SERVICE_NAME}

# 6. 重命名新容器
docker rename ${SERVICE_NAME}-new ${SERVICE_NAME}

echo "Deployment completed!"
总结
CI/CD流水线设计的关键点:
- 标准化:统一的Jenkins Pipeline模板
- 多类型支持:前端、Node.js、Python不同构建策略
- 镜像管理:Harbor私有仓库,版本化镜像
- 网关层:APISIX统一入口,路由/限流/监控
- 服务发现:etcd动态配置
- 监控告警:Prometheus + Grafana全链路监控
- 部署策略:蓝绿部署、滚动更新
下一篇将介绍多语言微服务架构中Node.js与Python的协作。